Tiling
Last Updated 3/28/10
Tiling is a common method to create flexible level engines. Here you'll learn to load a tile map to place the tiles and how to interact with and show tiles.Tiling tutorial with SDL 2 is now available.
Here we're going to use the 12 tiles from this sprite sheet:
 (tiles are 50% actual size)
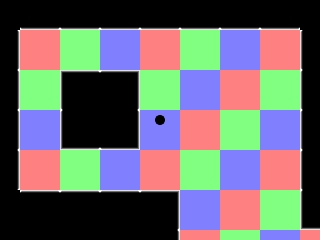
To create this level:
 (level is also 50% actual size)
Notice that one benefit of using tiles is that we save RAM. Instead of using a 1280 x 960 image, we only use a 320 x 240 image. This saves 4 1/2 megabytes of RAM.
To create this level:
Notice that one benefit of using tiles is that we save RAM. Instead of using a 1280 x 960 image, we only use a 320 x 240 image. This saves 4 1/2 megabytes of RAM.
//Tile constants
const int TILE_WIDTH = 80;
const int TILE_HEIGHT = 80;
const int TOTAL_TILES = 192;
const int TILE_SPRITES = 12;
//The different tile sprites
const int TILE_RED = 0;
const int TILE_GREEN = 1;
const int TILE_BLUE = 2;
const int TILE_CENTER = 3;
const int TILE_TOP = 4;
const int TILE_TOPRIGHT = 5;
const int TILE_RIGHT = 6;
const int TILE_BOTTOMRIGHT = 7;
const int TILE_BOTTOM = 8;
const int TILE_BOTTOMLEFT = 9;
const int TILE_LEFT = 10;
const int TILE_TOPLEFT = 11;
Here's two sets of global constants having to do with the tiles.
The first set constants are things like the tile dimensions, how many tiles we're going to use, and how many kinds of tiles we have.
The second set is symbolic constants for all the different tiles we have. The first 3 tiles types (red, green, and blue) are floor tiles the dot can move over. All the others are wall type tiles.
//The tile
class Tile
{
private:
//The attributes of the tile
SDL_Rect box;
//The tile type
int type;
public:
//Initializes the variables
Tile( int x, int y, int tileType );
//Shows the tile
void show();
//Get the tile type
int get_type();
//Get the collision box
SDL_Rect get_box();
};
Here's the break down of the tile class.
"box" is the offsets and dimensions of the tile and it also functions as a collision box. "type" is the obviously what type of tile the tile is.
Then we have the constructor which sets the tile's offsets, and type. Then the show() function shows the tile on the screen. Lastly we have get_type() and get_box() which simply retrieve the tile's type and collision box.
//The dot
class Dot
{
private:
//The dot's collision box
SDL_Rect box;
//The velocity of the dot
int xVel, yVel;
public:
//Initializes the variables
Dot();
//Takes key presses and adjusts the dot's velocity
void handle_input();
//Moves the dot
void move( Tile *tiles[] );
//Shows the dot on the screen
void show();
//Sets the camera over the dot
void set_camera();
};
Here's our friend the dot class.
It's essentially the same thing as it was in the scrolling tutorial,
only now the move() function takes in tiles so it can interact with them.
Tile::Tile( int x, int y, int tileType )
{
//Get the offsets
box.x = x;
box.y = y;
//Set the collision box
box.w = TILE_WIDTH;
box.h = TILE_HEIGHT;
//Get the tile type
type = tileType;
}
Here's the Tile constructor.
Nothing much to explain here, it just sets the tile at the given offsets, sets the dimensions, and gets the tile type.
void Tile::show()
{
//If the tile is on screen
if( check_collision( camera, box ) == true )
{
//Show the tile
apply_surface( box.x - camera.x, box.y - camera.y, tileSheet, screen, &clips[ type ] );
}
}
Now it's time to show the tile on the screen.
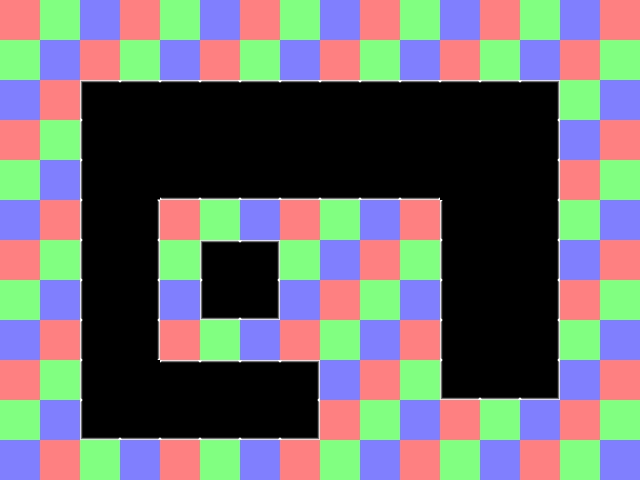
First we check if the tile is on the screen. So if the red rectangle is the camera:
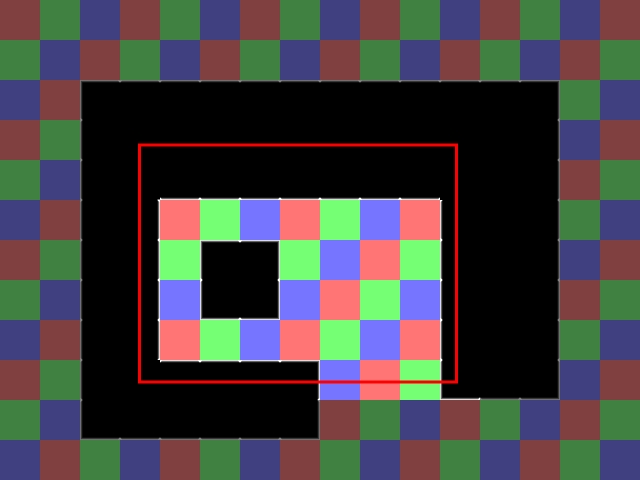 Only the lighted tiles will get shown.
It makes sense since why would you apply a surface if it won't be seen?
Only the lighted tiles will get shown.
It makes sense since why would you apply a surface if it won't be seen?
When we apply the tile image, we show the tile from the tile sheet relative to the camera so the tiles will scroll.
First we check if the tile is on the screen. So if the red rectangle is the camera:
When we apply the tile image, we show the tile from the tile sheet relative to the camera so the tiles will scroll.
int Tile::get_type()
{
return type;
}
SDL_Rect Tile::get_box()
{
return box;
}
These functions right here simply retrieve the tile's type and collision box.
bool set_tiles( Tile *tiles[] )
{
//The tile offsets
int x = 0, y = 0;
//Open the map
std::ifstream map( "lazy.map" );
//If the map couldn't be loaded
if( map == NULL )
{
return false;
}
Here's our function to set the tiles.
At the top we have two offset variables. They're used to keep track of where to place the tiles. Then we open up our map file.
At the top we have two offset variables. They're used to keep track of where to place the tiles. Then we open up our map file.
//Initialize the tiles
for( int t = 0; t < TOTAL_TILES; t++ )
{
//Determines what kind of tile will be made
int tileType = -1;
//Read tile from map file
map >> tileType;
//If the was a problem in reading the map
if( map.fail() == true )
{
//Stop loading map
map.close();
return false;
}
Now it's time to go through and set the tiles.
First we read an integer from the file. If there was a problem in reading the file we close the file and return false.
Here's the contents of the "lazy.map" file:
00 01 02 00 01 02 00 01 02 00 01 02 00 01 02 00
01 02 00 01 02 00 01 02 00 01 02 00 01 02 00 01
02 00 11 04 04 04 04 04 04 04 04 04 04 05 01 02
00 01 10 03 03 03 03 03 03 03 03 03 03 06 02 00
01 02 10 03 08 08 08 08 08 08 08 03 03 06 00 01
02 00 10 06 00 01 02 00 01 02 00 10 03 06 01 02
00 01 10 06 01 11 05 01 02 00 01 10 03 06 02 00
01 02 10 06 02 09 07 02 00 01 02 10 03 06 00 01
02 00 10 06 00 01 02 00 01 02 00 10 03 06 01 02
00 01 10 03 04 04 04 05 02 00 01 09 08 07 02 00
01 02 09 08 08 08 08 07 00 01 02 00 01 02 00 01
02 00 01 02 00 01 02 00 01 02 00 01 02 00 01 02
It's just a bunch of numbers. Each number corresponds with a type of tile. It's a simple, maybe even crude way to save a tile map, but it works.
//If the number is a valid tile number
if( ( tileType >= 0 ) && ( tileType < TILE_SPRITES ) )
{
tiles[ t ] = new Tile( x, y, tileType );
}
//If we don't recognize the tile type
else
{
//Stop loading map
map.close();
return false;
}
Now that we read the number from the file, we have to set the proper tile. First we check if the number from the
file is a valid tile type. If it is then we place the tile.
If the number read in from the file doesn't match one of our tiles types, we close the file and return false.
If the number read in from the file doesn't match one of our tiles types, we close the file and return false.
//Move to next tile spot
x += TILE_WIDTH;
//If we've gone too far
if( x >= LEVEL_WIDTH )
{
//Move back
x = 0;
//Move to the next row
y += TILE_HEIGHT;
}
}
At the end of our tile placement loop we move over to the next tile spot.
//Close the file
map.close();
//If the map was loaded fine
return true;
}
When we're done with a file, we have to remember to close it by calling the close() function.
bool touches_wall( SDL_Rect box, Tile *tiles[] )
{
//Go through the tiles
for( int t = 0; t < TOTAL_TILES; t++ )
{
//If the tile is a wall type tile
if( ( tiles[ t ]->get_type() >= TILE_CENTER ) && ( tiles[ t ]->get_type() <= TILE_TOPLEFT ) )
{
//If the collision box touches the wall tile
if( check_collision( box, tiles[ t ]->get_box() ) == true )
{
return true;
}
}
}
//If no wall tiles were touched
return false;
}
touches_wall() goes through the set of tiles and returns true if it finds a wall tile that collides with the given
collision box.
Rather than checking for each individual type of wall tile, we remember how tiles types are numbered:
0 = TILE_RED
1 = TILE_GREEN
2 = TILE_BLUE
3 = TILE_CENTER
4 = TILE_TOP
5 = TILE_TOPRIGHT
6 = TILE_RIGHT
7 = TILE_BOTTOMRIGHT
8 = TILE_BOTTOM
9 = TILE_BOTTOMLEFT
10 = TILE_LEFT
11 = TILE_TOPLEFT
As you can see, all the wall tiles are numbered between the center tile and the top left tile. So to check if the tile is a wall, we just check if its type is between center and top left.
void Dot::move( Tile *tiles[] )
{
//Move the dot left or right
box.x += xVel;
//If the dot went too far to the left or right or touched a wall
if( ( box.x < 0 ) || ( box.x + DOT_WIDTH > LEVEL_WIDTH ) || touches_wall( box, tiles ) )
{
//move back
box.x -= xVel;
}
//Move the dot up or down
box.y += yVel;
//If the dot went too far up or down or touched a wall
if( ( box.y < 0 ) || ( box.y + DOT_HEIGHT > LEVEL_HEIGHT ) || touches_wall( box, tiles ) )
{
//move back
box.y -= yVel;
}
}
The only change we made to the Dot class is that we check if the dot collides with any wall tiles when we move it.
//Quit flag
bool quit = false;
//The dot
Dot myDot;
//The tiles that will be used
Tile *tiles[ TOTAL_TILES ];
//The frame rate regulator
Timer fps;
//Initialize
if( init() == false )
{
return 1;
}
//Load the files
if( load_files() == false )
{
return 1;
}
//Clip the tile sheet
clip_tiles();
//Set the tiles
if( set_tiles( tiles ) == false )
{
return 1;
}
Here's the top of our main() function.
Near the top we make an array of pointers to Tiles. Then we initialize and load image files, and we set the clip rectangles for the tile sheet with clip_tiles(). After that we create and set our tiles with set_tiles().
Near the top we make an array of pointers to Tiles. Then we initialize and load image files, and we set the clip rectangles for the tile sheet with clip_tiles(). After that we create and set our tiles with set_tiles().
//While the user hasn't quit
while( quit == false )
{
//Start the frame timer
fps.start();
//While there's events to handle
while( SDL_PollEvent( &event ) )
{
//Handle events for the dot
myDot.handle_input();
//If the user has Xed out the window
if( event.type == SDL_QUIT )
{
//Quit the program
quit = true;
}
}
//Move the dot
myDot.move( tiles );
//Set the camera
myDot.set_camera();
//Show the tiles
for( int t = 0; t < TOTAL_TILES; t++ )
{
tiles[ t ]->show();
}
//Show the dot on the screen
myDot.show();
//Update the screen
if( SDL_Flip( screen ) == -1 )
{
return 1;
}
//Cap the frame rate
if( fps.get_ticks() < 1000 / FRAMES_PER_SECOND )
{
SDL_Delay( ( 1000 / FRAMES_PER_SECOND ) - fps.get_ticks() );
}
}
Here's our main loop. Nothing much to explain here, just wanted to show everything in action.
void clean_up( Tile *tiles[] )
{
//Free the surfaces
SDL_FreeSurface( dot );
SDL_FreeSurface( tileSheet );
//Free the tiles
for( int t = 0; t < TOTAL_TILES; t++ )
{
delete tiles[ t ];
}
//Quit SDL
SDL_Quit();
}
Since we dynamically allocated our Tile objects, we have to remember to free them in our clean_up() function.
I've made a level editor for this tiling engine. You can check how it works and download the working program on article 9.
I've made a level editor for this tiling engine. You can check how it works and download the working program on article 9.